What Are Continuous Integration and Continuous Deployment (CI/CD)?

.png)
dev, CD pipeline deploys dist folder on merge to main.npm ci, npm run build, and aws s3 sync in the CD pipeline.
We at Codesmith cultivate technologists who are at the intersection of society and tech, able to meet this moment and thrive in an ever-changing world. Ready to become a modern software engineer?
Continuous Integration and Continuous Deployment may feel a bit abstract and difficult to conceptualize especially if you’re new to programming. However, it’s become a standard practice in modern software development and it will save your team quite a bit of time and frustration in the long run. In this article we will:
When you’re working with a team of engineers, you need to be able to build, test and merge your code with the rest of your team’s in a centralized repository (like GitHub). Continuous integration is the process of doing just that. Instead of each engineer working in isolation for long periods and struggling with large commits, continuous integration encourages frequent commits from teammates and automates the process of building and testing those changes. This helps developers identify issues and debug early on and negates the process of manually building and testing. That means more time spent writing code and less time fixing it.
The CD in CI/CD actually has two meanings. It can mean continuous delivery and continuous deployment. Continuous delivery is the practice of continually staging code so that it may be manually deployed at any given time. Once the code passes its tests, the code is automatically prepared for release but the actual deployment to production is manual. Continuous deployment takes this process a step further by automating the deployment process immediately after tests are passed.
It really comes down to speed. With CI/CD you automate the testing and deployment process drastically reducing manual effort and expediting the delivery cycle. This may take a bit of time to configure but ultimately saves teams quite a bit of time in the long run. Imagine you’re working with a team of engineers who aren't practicing CI/CD. Instead of the efficient workflow seen above, yours might look like this:
This process is time consuming and doesn’t scale well. Just imagine how complicated this workflow could get with a team of even a few developers! Continuous integration/continuous deployment automates this workflow, saving your team time and allowing for more frequent and reliable updates to your application.
Standardizing your team's workflow with a CI/CD pipeline also greatly improves collaboration by helping to eliminate frustrating merge conflicts, merges to the wrong branches, inconsistent environments among team members, and manual testing errors.
Think of building an application like building a lego house with your friends. Everybody adds pieces, but without clear coordination, someone is bound to put a window where a door should be… or accidentally leave a piece out for Mom or Dad to step on.
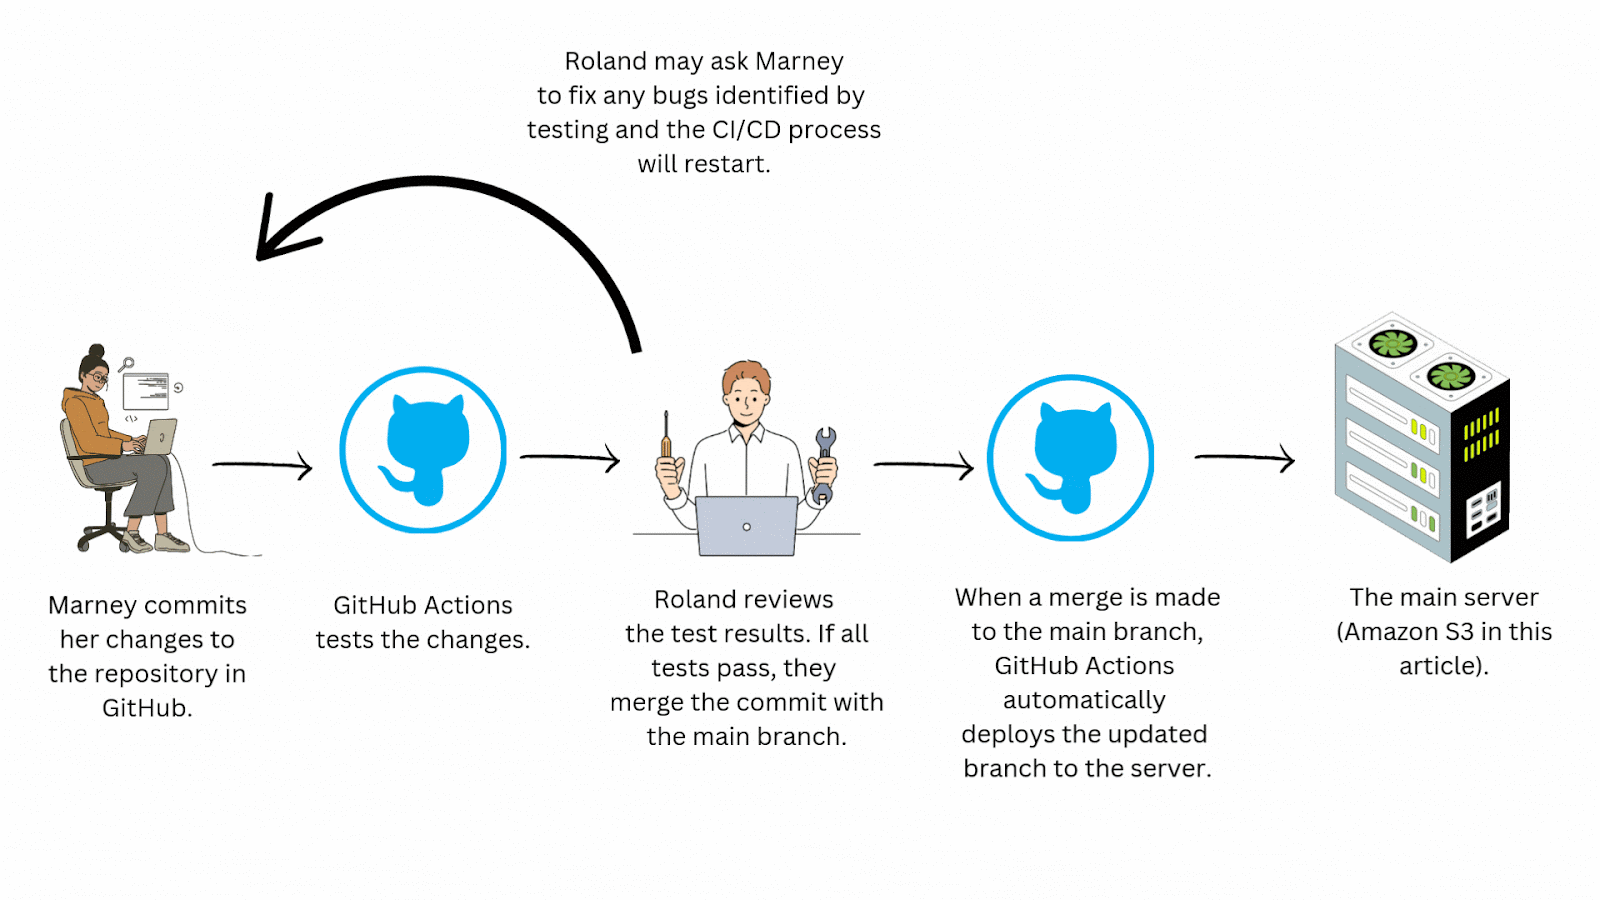
For this article, we built a very simple frontend React application hosted in an Amazon Web Services S3 bucket. Our continuous integration has been configured such that:
Our continuous delivery has been set up so that:
*Note- this is considered continuous delivery and not continuous deployment because the process of merging updated code into our main branch is manual. It’s generally a good idea to make pull requests manually- that way your team can leave detailed notes and conduct code reviews for each pull request. If we configured GitHub Actions to automatically merge pull requests to the main branch and automatically deploy the updated code to our S3 bucket, it would be considered continuous deployment.
It’s also good to note that, in practice, it’s common for teams to run multiple CI pipelines before a CD pipeline. Let’s say a team of developers is working on an update with new features for an application. Your team will make pull requests to the dev branch with these changes. A CI pipeline can be configured to test these changes to ensure they are ready to be merged to dev. Once all of the features have been merged into dev, a project manager can create a pull request to merge dev with the main branch. This final merge would then trigger our CD pipeline to execute- deploying our new features to production.

Below we see a repository for our basic React application.
Since our application is composed of static files only, it is stored and served from an Amazon S3 bucket. When a user visits our site’s URL, it will render the following to the browser:

Below, we see what our application looks like in our S3 bucket.
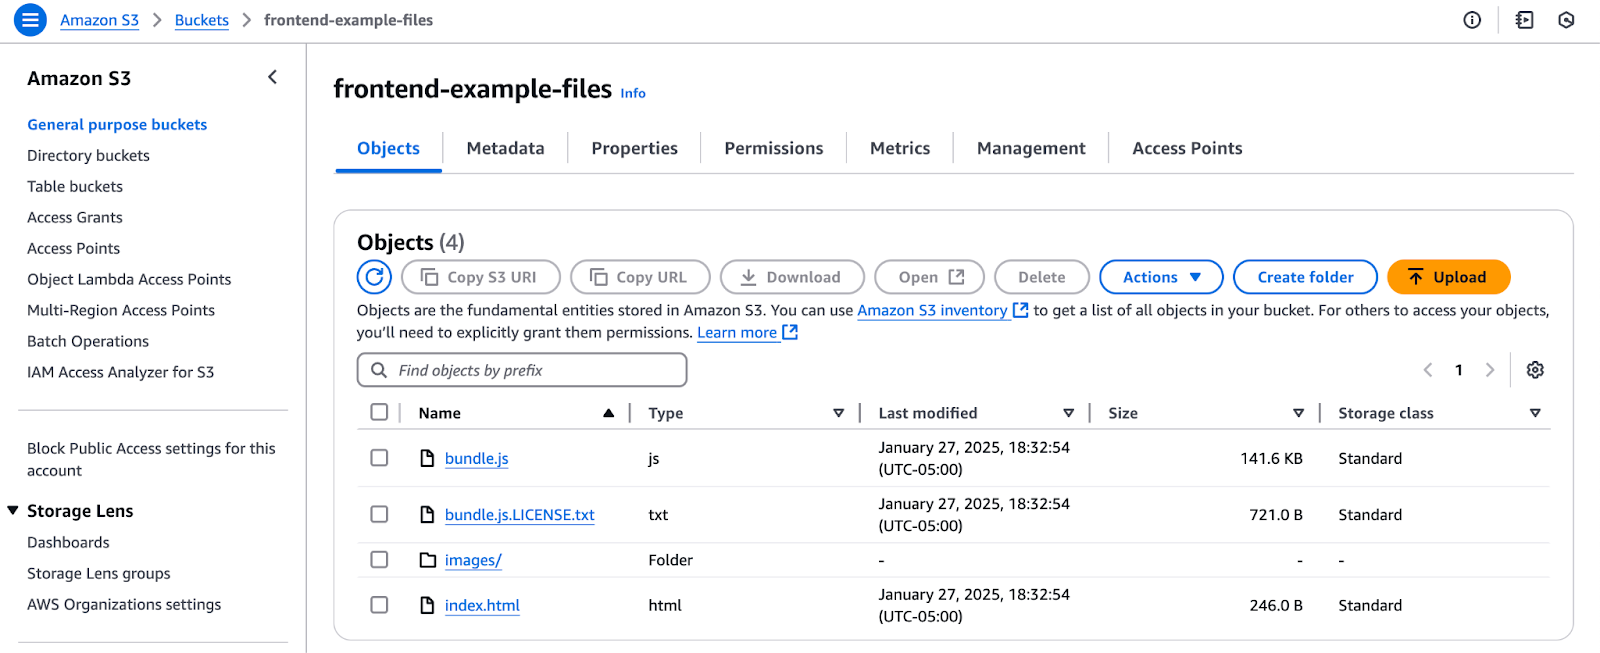
But wait. Why are there only four files in this bucket? In the image showing our repository, it looks like our application is composed of a lot more than just four files, right? This is because our S3 bucket is only storing and serving the files in our dist folder.
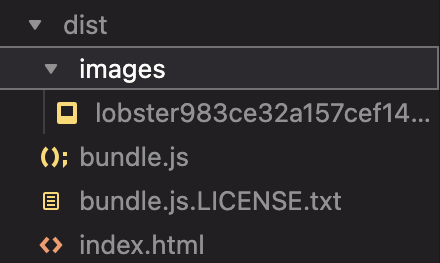
If you’re unfamiliar, a dist folder (short for distribution or build folder) contains all of our bundled and optimized files that our application needs to run in production. You can think of the dist folder as a translator that takes all of your raw files (JavaScript, CSS, images) and converts them into a short, efficient language that computers can understand—without all of the unnecessary spaces, long variable names, etc. These optimizations help reduce file sizes which improves loading speeds, and makes your app run faster in the real world.
Let’s say we wanted to make a change to our application. We would need to make the change to our code, and then rebuild the dist folder so that it now includes the updated version. We then need that updated dist folder to be sent off to our S3 bucket so users can see the updated application.
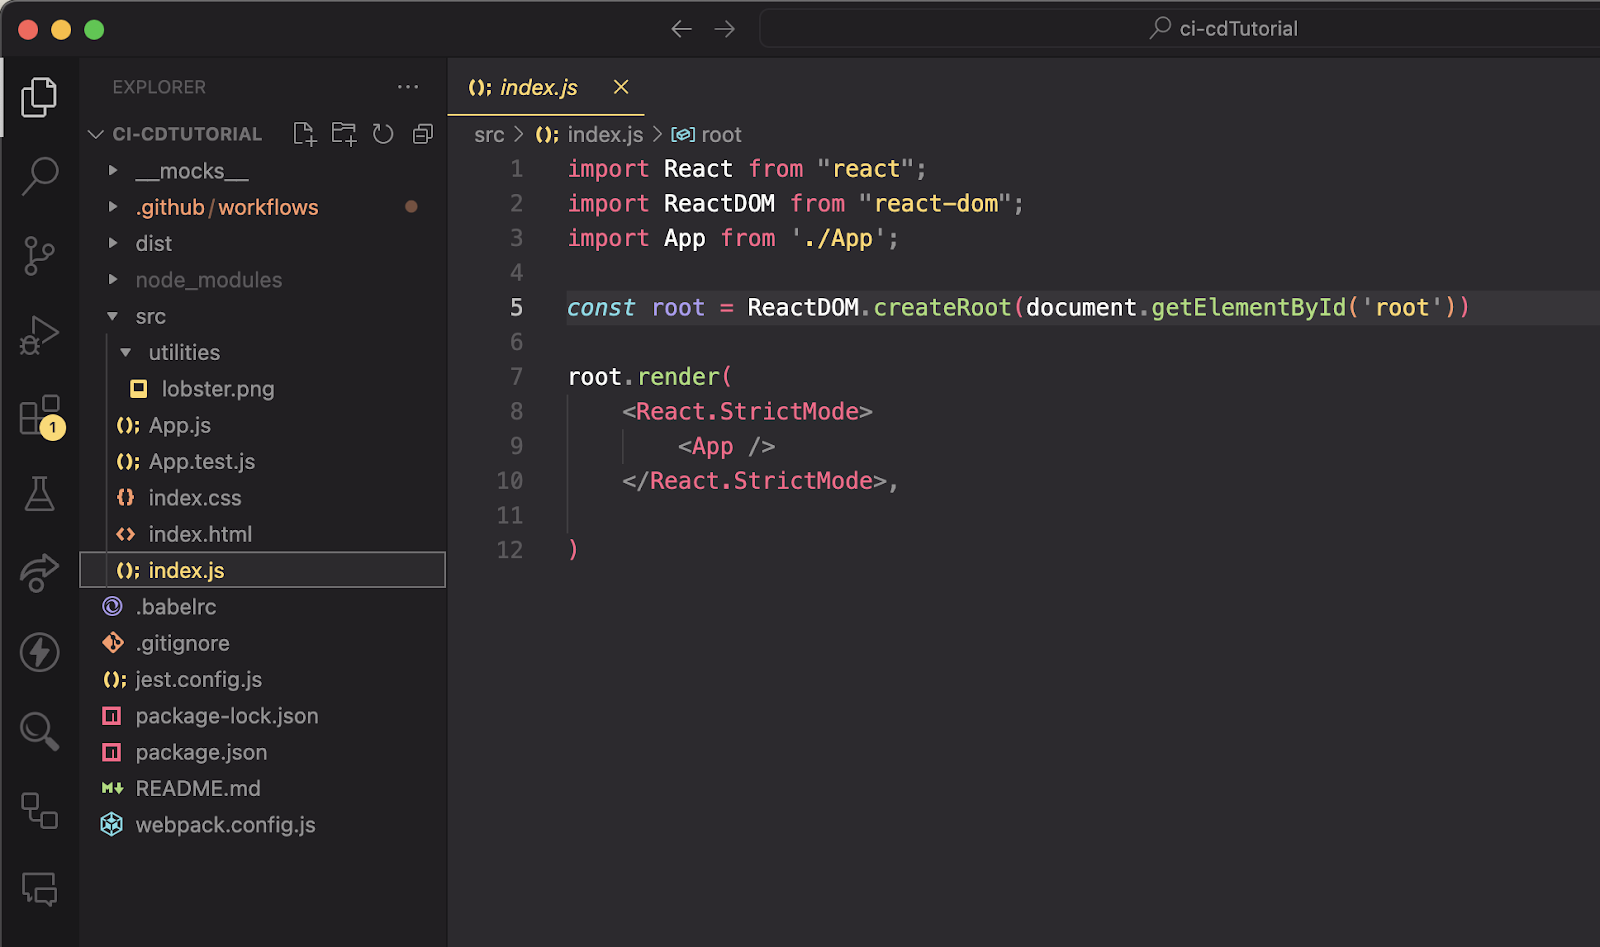
But wait, before we can do anything with our new, updated code, we need to make sure that it still passes all of our tests. This is where continuous integration comes in. We’ll need to build a .yml file that will automate this process in GitHub Actions—a tool built into GitHub that allows you to automate your continuous integration/continuous delivery workflow. This can be done directly in GitHub by selecting Actions > New workflow > set up a workflow yourself.
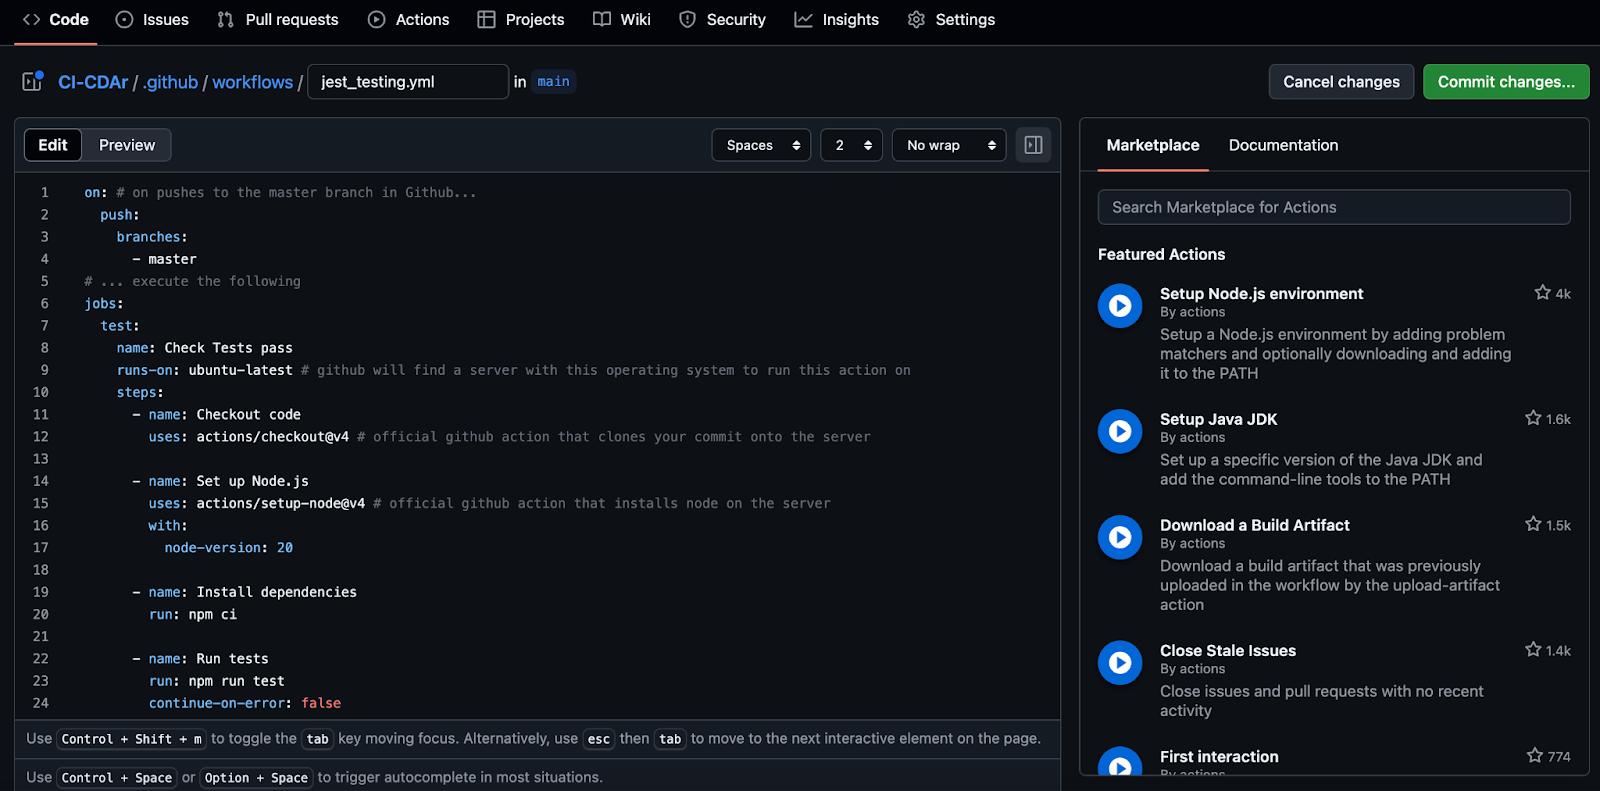
For this tutorial, we built our .yml files directly in VSCode as seen below. Either way works - notice how the file path is exactly the same (CD-CDAr/.github/workflows/jest_test.yml) whether we do this through GitHub (above) or in VSCode (below).
Let’s break down how this .yml file is configured to automatically run our tests whenever we try to merge a change to our dev branch in GitHub.
The section below specifies the event that triggers our workflow. In this case, on a push to the dev branch. In other words, whenever a push is made to the dev branch in GitHub, our workflow will be executed. If you wanted to run the workflow when any push is made to GitHub, you could replace dev with ‘**’. This will trigger the workflow on pushes made to any branch in our repository.

Below:
- GitHub provides a new runner (virtual machine) for every single job and destroys it once the job completes. Each time a new job starts, a runner will be set up with a clean environment, so you don’t need to worry about any previous states from past jobs. Each time the workflow runs, it will be like a fresh, new machine which is why we need to specify the operating system for that machine (Ubuntu in this case).

Below:

Next up in our continuous integration workflow, we define the next step in our job:

The next step in our current job will simply run the command npm ci (or npm clean install) - a faster and more efficient version of npm install which is especially well suited for CI/CD. This command installs dependencies based on your package-lock.json file ensuring that the runner executing your code is using the exact dependencies and versions required. Before doing so, npm ci removes the node_modules folder. This makes sure that the installation of all dependencies starts from a clean slate avoiding any issues caused by leftover files. It’s important to note that, if you do not have a package-lock.json file or if your package.json has dependencies that do not match those in package-lock.json, npm ci will throw an error and this step will fail.

The final step in our continuous integration workflow is to run our test file. This ensures that any changes made to our repository don’t cause any bugs. Setting continue-on-error to false tells GitHub Actions, “if any of our tests fail, do not continue on with our workflow”.

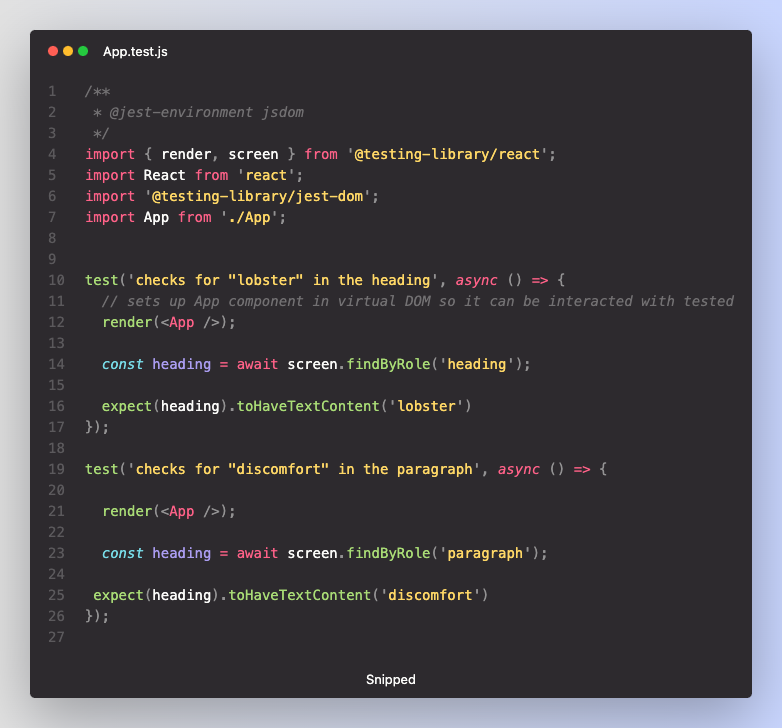
The specific tests being run are not important for this tutorial. But, just to provide some context, below you’ll see the file configured to ensure our code is still running smoothly. To keep it simple, we have just one test file with two simple tests - one that checks for the string ‘lobster’ in the heading and another that checks for the string ‘discomfort’ in the paragraph element.
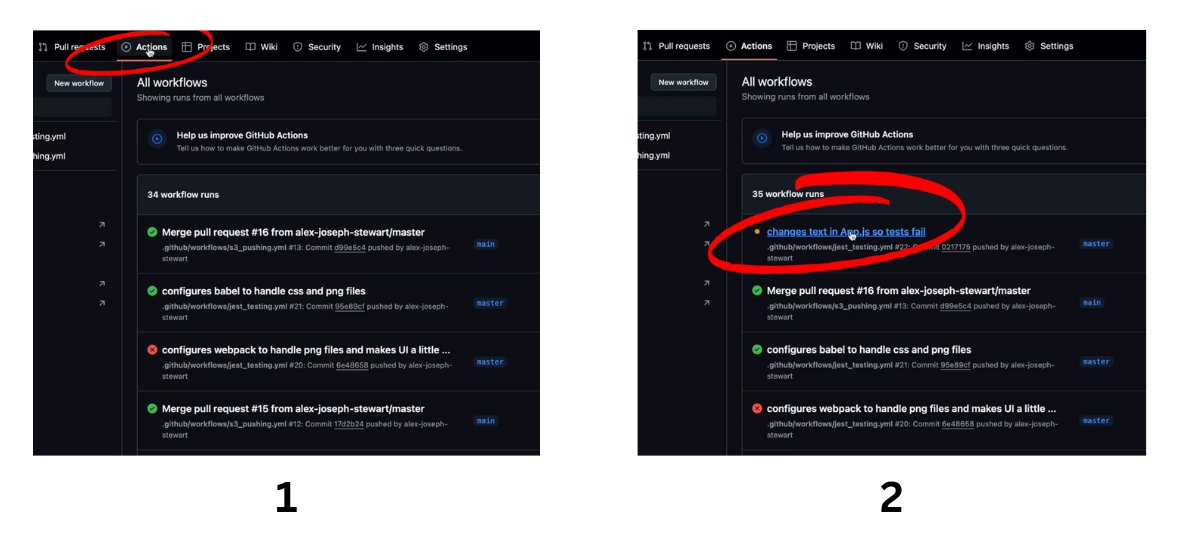
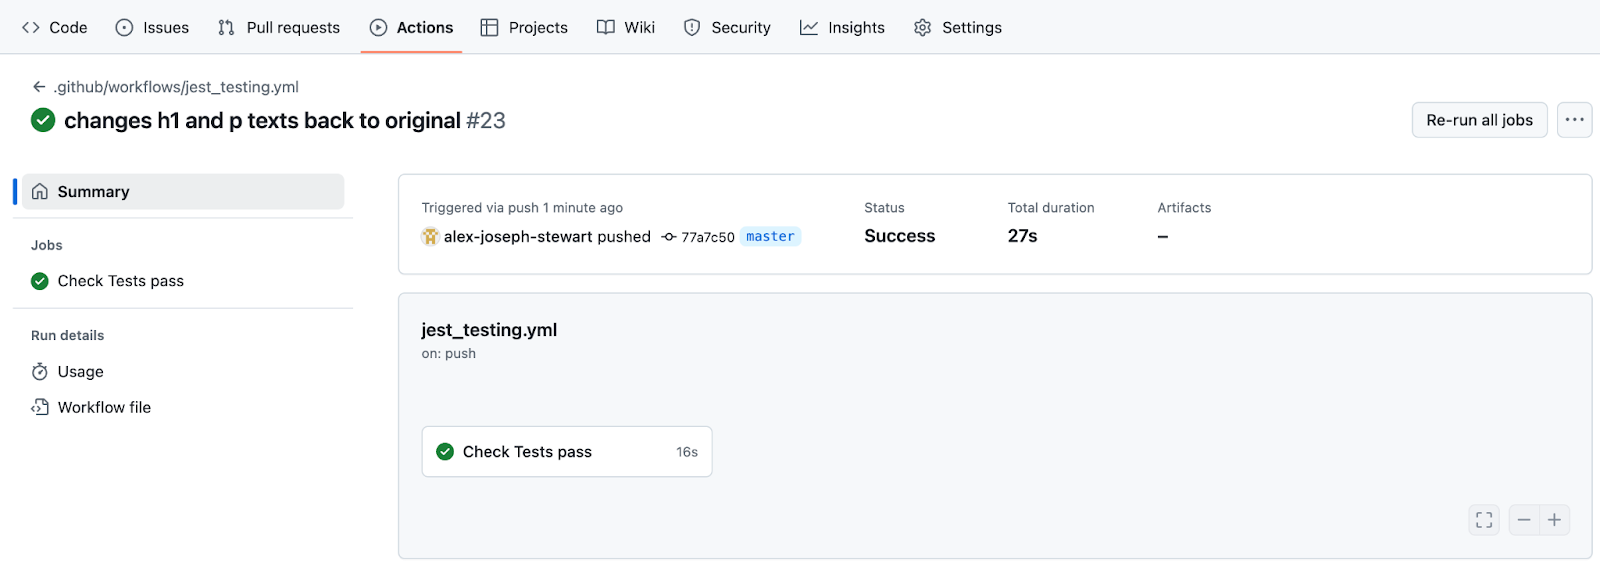
Let’s examine what it might look like to run this .yml file in GitHub Actions after pushing a new change to the dev branch. In this example, we will change the paragraph about lobsters to a paragraph about Codesmith. Without updating our tests, this will fail in GitHub Actions.
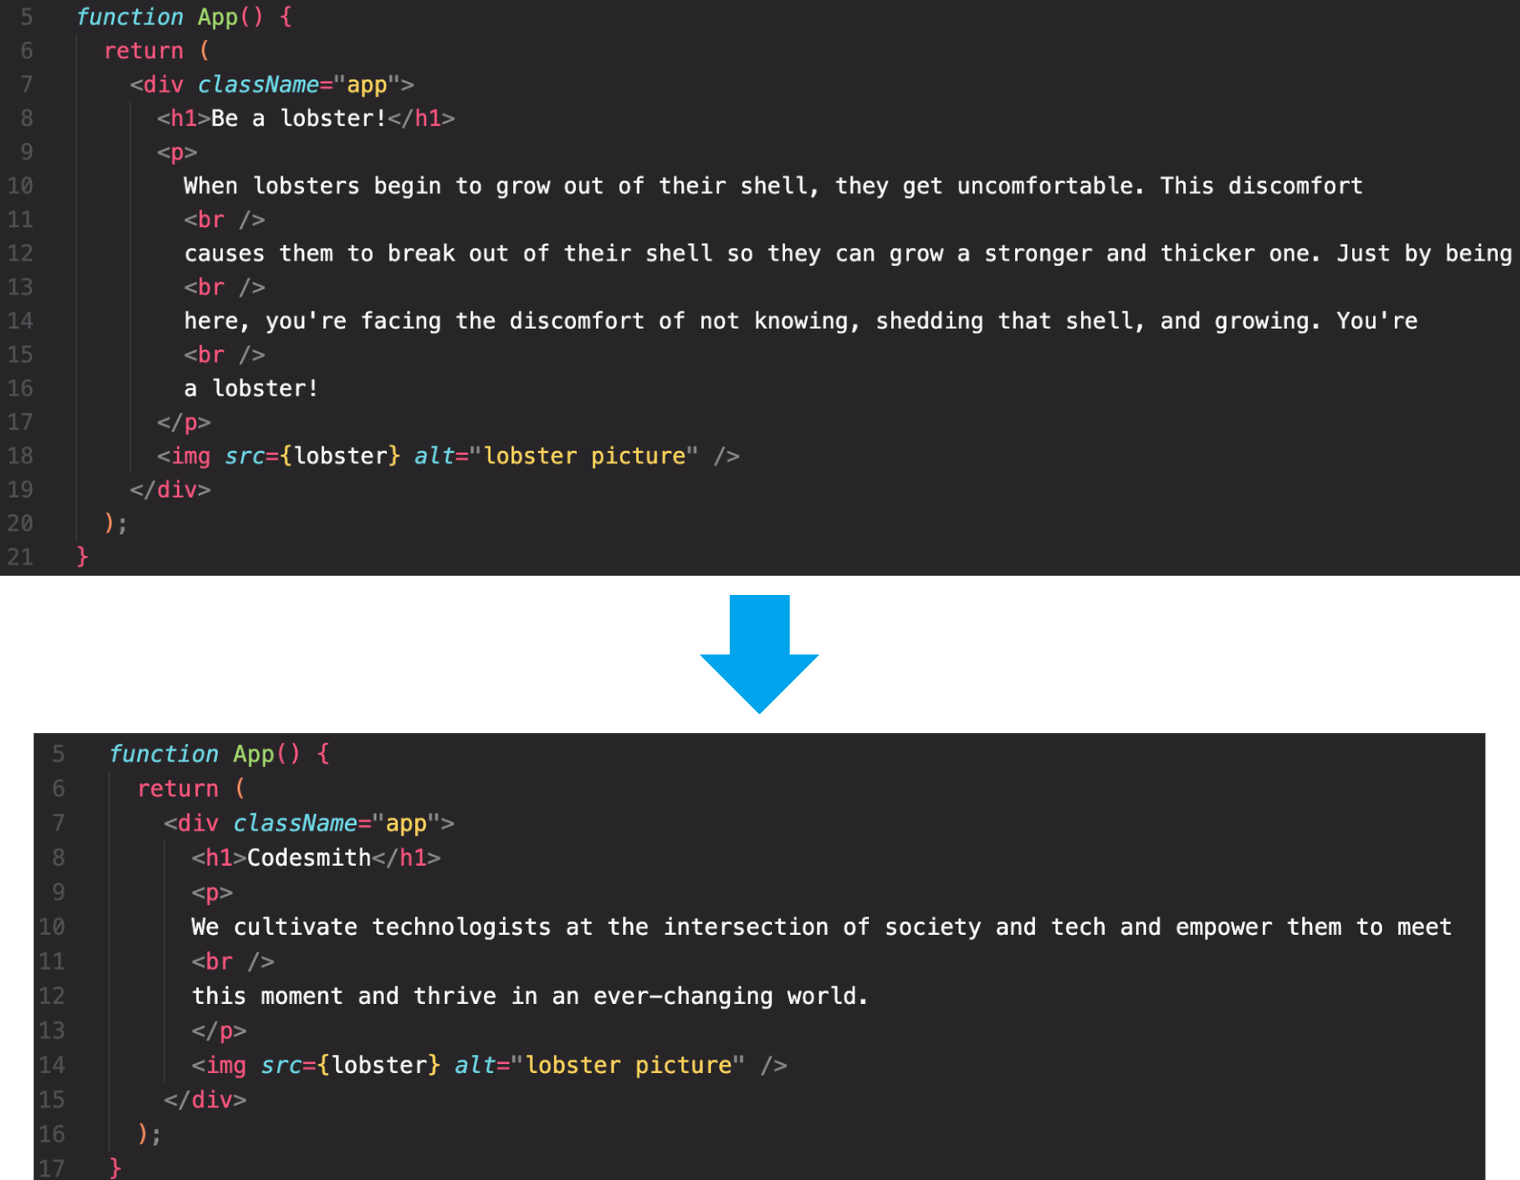
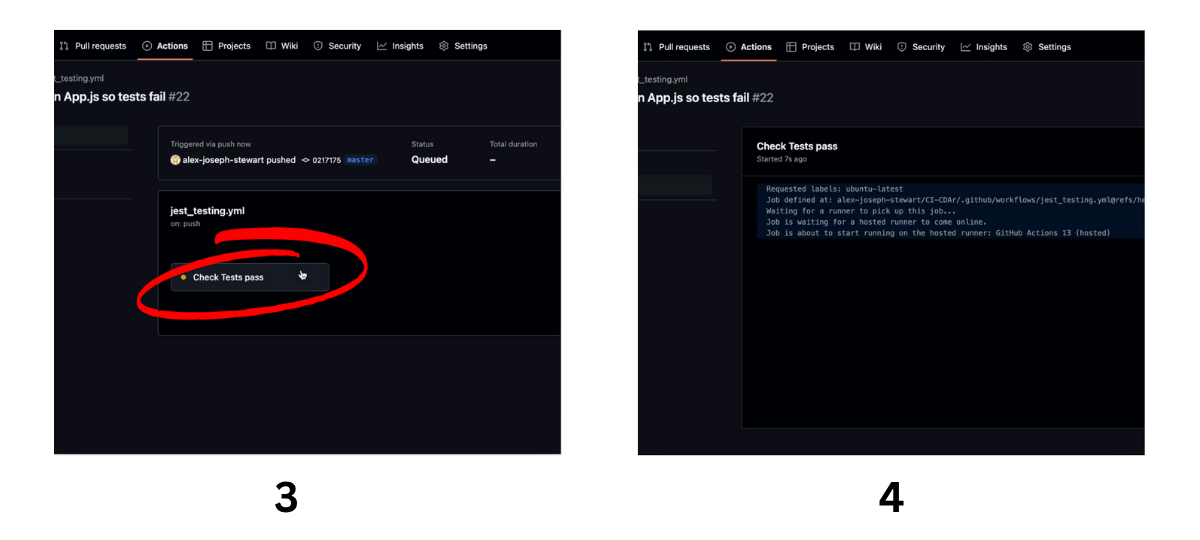
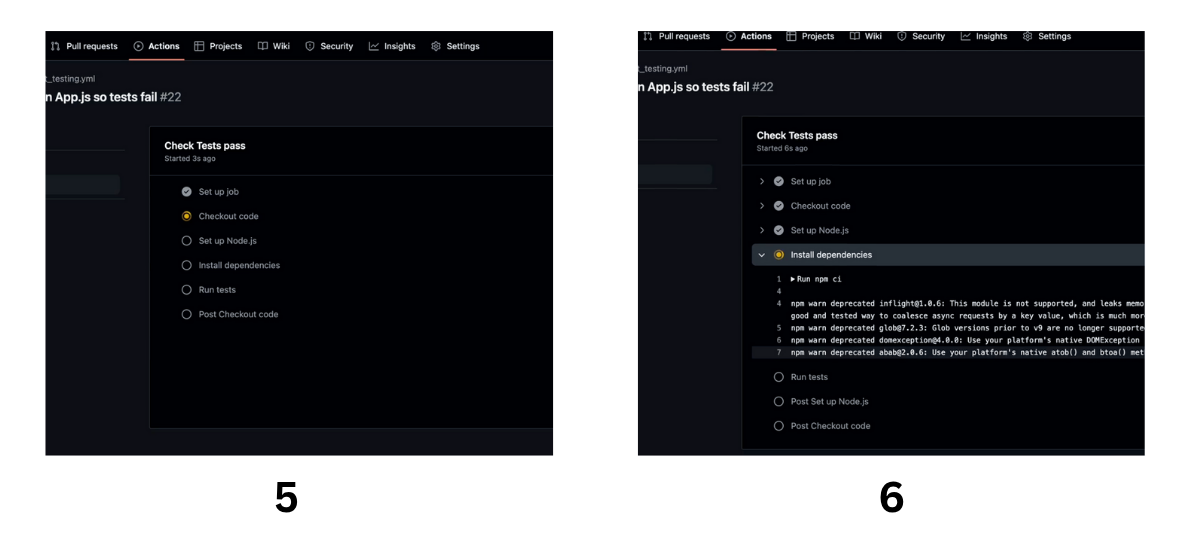
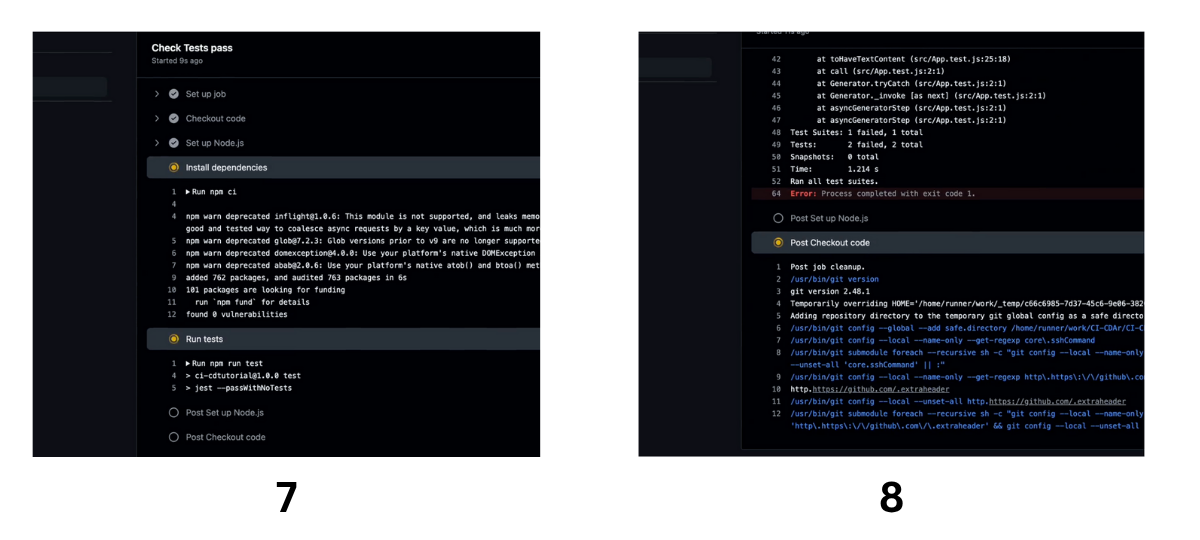
Below we see our GitHub Actions executing our continuous integration workflow when we push this change up to our remote repository in GitHub. Notice how, because we didn’t update our tests, this job throws an error.
And there you have it! Now we’ll change the text back to the original version so that our tests pass and we can continue on with continuous delivery.
Now that we’ve changed the text in our application back, the tests in our continuous integration workflow are passing as seen below. We can now move on to continuous delivery.
We will configure a new .yml file for continuous delivery to automatically rebuild our dist folder and send it to our Amazon S3 bucket as soon as a push (merge) is made with our main branch. Let’s take a look at our workflow. Since we need a new .yml file for each on trigger, we’ll create a new file s3_pushing.yml. Below, we have a job named Deploy Frontend that will execute on a push (merge) to the main branch. Take a look at lines 1-20. Look familiar? Be sure to check out the pseudo code if you need any review on what each of these first few steps in this job are doing.
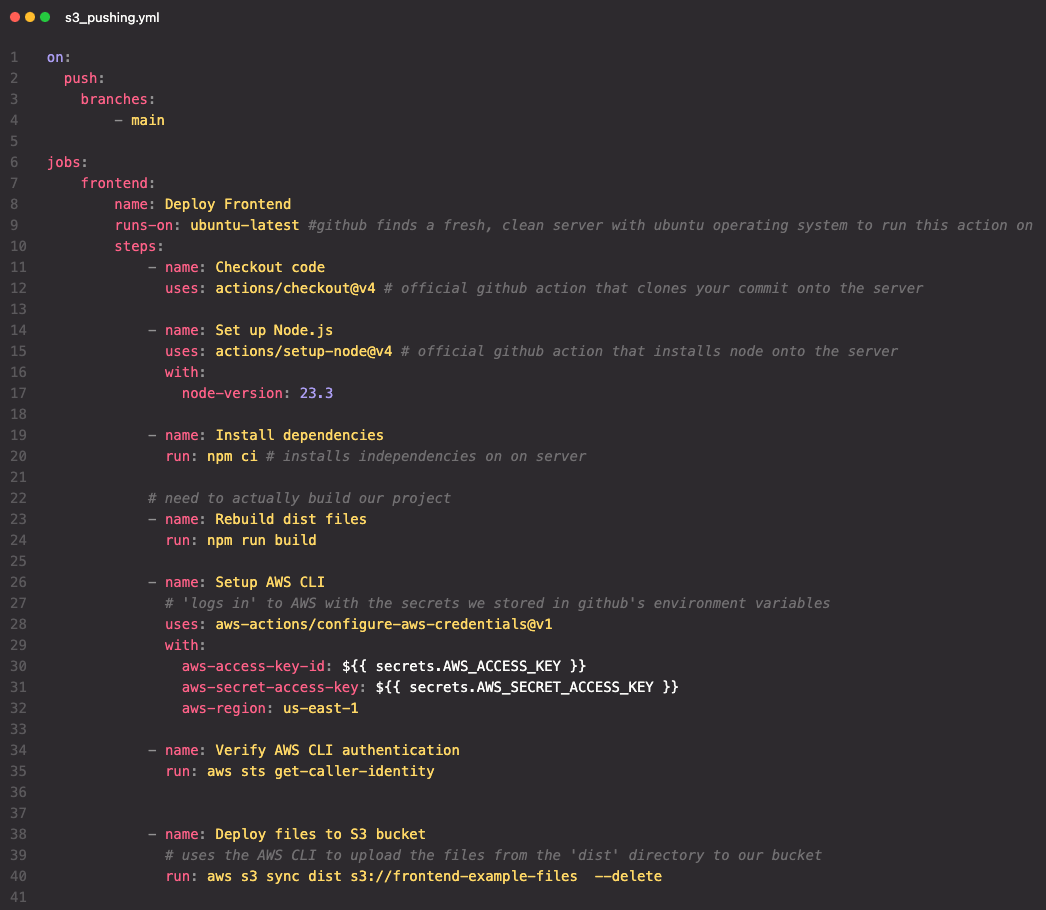
On line 24 our workflow runs the command npm run build.

We have configured the build command in our package.json to run webpack in production mode, which bundles and optimizes our code for deployment. This is what rebuilds our dist folder. Remember, the dist folder is what we will soon be sending to our S3 bucket in this workflow.

Back in our workflow, we’ll need to set up the AWS Command line interface (CLI) to log us into AWS so our workflow can access our S3 bucket through Github Actions. We’ll see this in action in a moment but first, let’s break down what’s happening below.

We won’t go into detail on setting up an AWS IAM User but at a high level, we have:
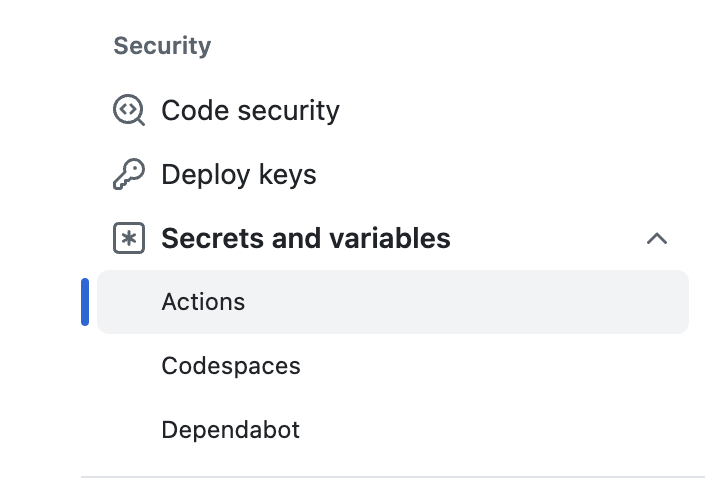
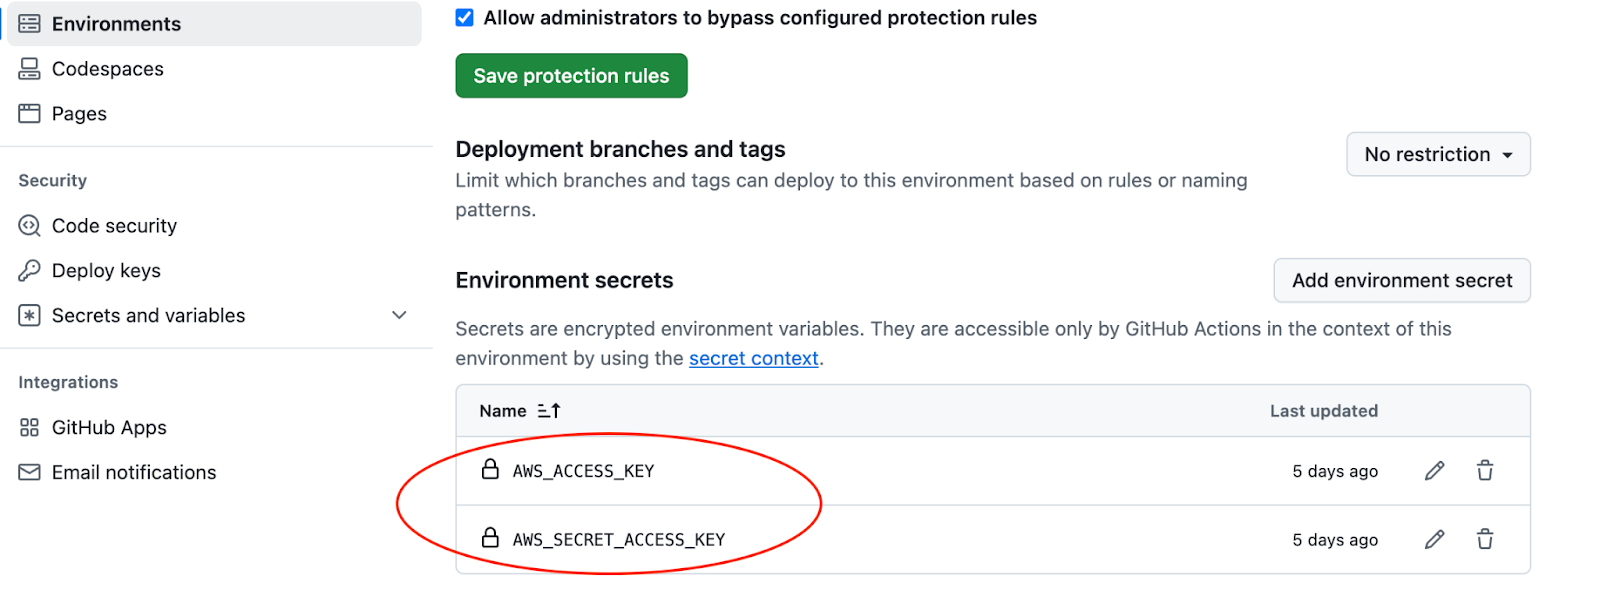
To add these keys as secrets go to Settings > Security > Secrets and variables > Actions.
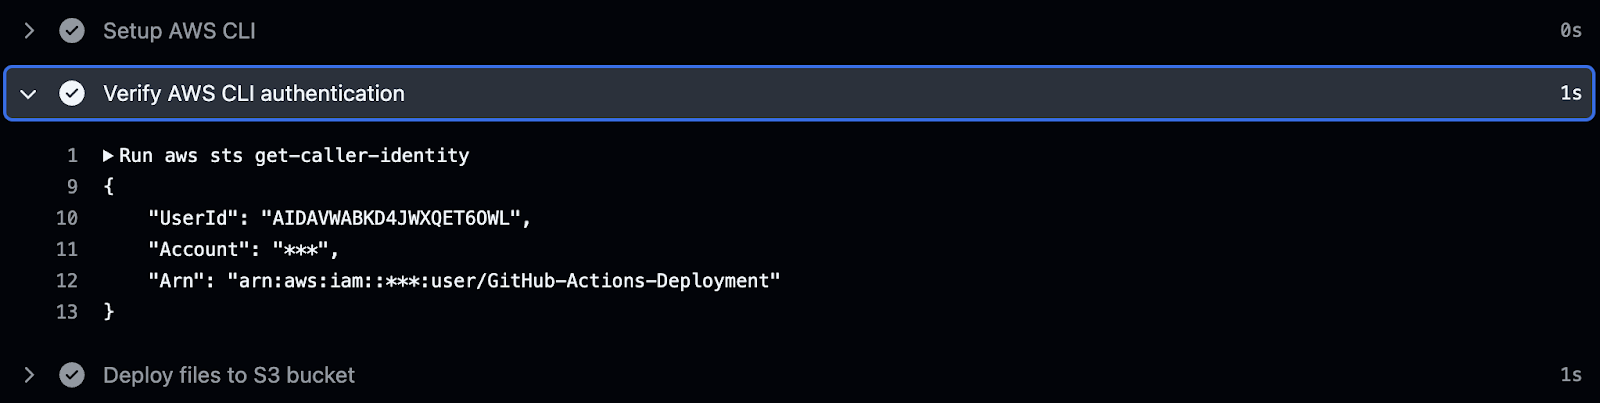
Line 35 below runs the aws sts get-caller-identity command. When this command is run it will provide information about the identity (IAM User or Role) executing the command. This includes the account name, the user id and the Amazon Resource Name (ARN). If you're running into issues where permissions are not working as expected, this command helps ensure that the right identity is being used for the AWS actions. It is not required, but always useful.

Below, we see the output of running aws sts get-caller-identity in our workflow on GitHub (sts is Amazon’s Secure Token Service).
And now we finally find ourselves at the final step in our continuous delivery pipeline - deploying our updated dist folder to our S3 bucket! Below, we do this on line 41 by running the aws s3 sync command where we specify:

And there we have it! We have successfully created and executed a continuous integration/continuous deployment pipeline using GitHub Actions. In this process we have effectively:
There are so many different ways to optimize your team’s workflow by leveraging a CI/CD pipeline. You can configure jobs that automate pull-requests, run linters on your code, even send Slack notifications about the CI/CD process, and much more. If you’re working with a team of engineers, you should definitely consider practicing continuous integration/continuous deployment as it will speed up the development process, keep your team organized, and alleviate frustrating merge conflicts. For more information and exploration, check out the GitHub Marketplace here. Happy integrating and deploying!
CI stands for continuous integration which is the practice of frequently committing changes to a codebase and automatically testing those changes to make sure they integrate smoothly with the existing code. This helps maintain a healthy codebase and speeds up development by identifying issues early on.
CD stands for continuous delivery or continuous deployment. Continuous delivery is the practice of always having code ready for deployment (staged) but it will not be deployed without manual intervention. For example, in this article, the latest version of our code is not deployed to Amazon S3 unless a pull request into the main branch is approved and merged. Once the merge is complete, our continuous delivery pipeline will automatically deploy our updated files to the S3 bucket. Continuous deployment takes this process a step further by automating the entire process from testing to deployment without the need for manual approval.
DevOps is a culture and set of best practices involving two teams that have traditionally worked separately- the development team (Dev) and the operations team (Ops). It breaks down the barriers between these teams and encourages collaboration, automation of certain processes (like testing, monitoring, and deployment), and communication to quickly resolve issues.
CI/CD falls under the umbrella of DevOps as a set of best practices and tools used within DevOps. It automates testing, monitoring, and deployment which speeds up the development process keeping it efficient and reliable.
Let’s say you’re working on an application in your local repository. You’ve been tasked with updating some of the buttons on the application’s homepage so you create a new branch, “homepageButtons” and make the required changes. You push your branch to the remote repository on GitHub.
Once your branch is pushed, GitHub Actions has been configured to automatically run the application’s test files any time a new branch is pushed. This would be an example of Continuous Integration (CI). It automatically tests your code to ensure that the changes you’ve made work smoothly with the existing code.
Let’s say all of your tests pass and the new buttons work seamlessly with the existing code. You then manually create a pull request to merge “homepageButtons” into the main branch. A teammate reviews the pull request, sees that all of your tests have passed, and merges “homepageButtons” into main.
Once this merge is complete, GitHub Actions has been configured to automatically deploy the updated main branch to production. Now, your code has been automatically deployed using Continuous Delivery (CD) and your brilliant new buttons are available to all users of your app.
Imagine you’re working on a group project. You and each team member are working separately and are responsible for your own parts of the project. Continuous Integration (CI) would be the process of automatically testing to make sure everyone’s changes work together. You would:
Continuous Delivery (or Continuous Deployment) would be the process of automatically getting your code to users. With Continuous Delivery:
Continuous Deployment is slightly different from Continuous Delivery in that it does not skip the manual approval step. Instead, the Continuous Deployment pipeline would automatically deploy your application to production as soon as all tests have passed.

Explore CS Prep further in our beginner-friendly program.
Get more free resources and access to coding events every 2 weeks.

Connect with one of our graduates/recruiters.

Our graduates/recruiters work at:

Alex Stewart is a former professional actor turned software developer and proud Codesmith alumni. Alex works to make technology both fun and accessible through tech talks, video tutorials, and blogs. With hands-on experience in React, Node, SQL databases, and more, Alex brings a deep respect for the development process and is committed to finding new ways to connect with developers and showcase their incredible work in the way it deserves.

Connect with one of our recruiters to learn about their journeys.
Our graduates/recruiters work at:

Copyright @ 2025 Codesmith | All Rights Reserved
Terms and ConditionsPrivacy PolicyRegulatory Information

%20(4).png)