Top 10 Techniques for JavaScript Performance Optimization


JavaScript performance optimization is crucial for creating fast, responsive web applications. This article highlights 10 key techniques to boost performance and improve user experience.
We at Codesmith cultivate technologists who are at the intersection of society and tech, able to meet this moment and thrive in an ever-changing world. Ready to become a modern software engineer?
When it comes to optimizing JavaScript code, there are countless tools and techniques available, but many of them lack context for implementation. In this article, we’ll not only cover the most common techniques but also provide examples and explain how they can be applied in your applications. Here are the top 10 techniques we found for optimizing your JavaScript code.
If you’re unfamiliar with the phrase “DOM manipulation” or are still unsure of what it actually means, let’s break it down. The DOM (Document Object Model) represents a web page as a tree of objects. Each HTML element is an object (or node), and when we modify the content or behavior of these objects in the DOM, we are practicing DOM manipulation.

Manipulating the DOM too frequently can be costly because every time the DOM is changed, the browser may need to recalculate the styles (reflow) and redraw parts of the page (repaint). By minimizing DOM manipulations or batching them together, you can reduce the number of reflows and repaints, resulting in smoother performance.
Below is an html file as represented in the DOM tree above. This document displays the text “Hello, World” and a button with the value “Change Text”

In our JavaScript file below, the “getElementById” method in our document object accesses the element in our HTML with the id of “greeting” (h1 element above) and assigns it to “greetingByElement”. We then do the same on the next line for “changeTextBtn” (our button element). We then add an “event listener” to our button so that when it’s clicked, our h1 element will display “Hello, JavaScript!”.

Document fragments can be used to hold DOM elements temporarily in memory before appending them to the document in a single operation. Think of it as saving up all the changes you’d like to make and applying them all at once.
Below, we use a “for loop” to iterate through some data and create 100 new div elements with some content in them. We then append each of those divs to a “fragment”. Once the loop is complete, the “fragment” containing all of our new divs is appended to our DOM. Now the DOM re-renders once with all of our new divs instead of 100 times.

Using methods like “requestAnimationFrame”, “setTimeout” ,“setInterval” and utilizing the “innerHTML” element may also help minimize the number of DOM reflows and repaints by batching updates.
Libraries like React abstract away the DOM update process and optimize when and how updates are made using a "virtual DOM."
JavaScript offers several ways to iterate through arrays and other iterable objects. For example, the forEach method will iterate over an array and execute a function on each element within the array. While methods like forEach, map, or reduce can be useful, they are not always the most efficient option, especially when iterating through large amounts of data.
A classic for loop or for…of loop is often a better choice. This is because these loops allow for early exits (such as break or return), which is not possible with forEach.

Below, this “for loop” will iterate through “array” and log each element to the console. If the element is even, we exit this loop with “return”. Exiting a loop like this would not be possible using “forEach”.

Below, we see a “for…of” loop. This would be used when you want to iterate through an array but do not need access to each element by its index.

A “for…in” loop is designed for iteration over keys (property names) in objects. These loops can technically iterate over arrays but it’s generally not recommended because they will also iterate over any custom properties or methods that are added to an array as well as properties added to its prototypal chain.

While using loops, it’s essential to be mindful of nested loops, as they can become expensive when working with larger datasets.
Higher-order functions like “map”, “filter”, and “reduce" might be the right choice for readability but may introduce unnecessary computational costs. Making informed decisions regarding array and object iteration ensures that your code performs well, even with large data sets.
Optimizing how you retrieve information from your data structures can prevent your JavaScript from doing extra work. If you need to access the same property or element multiple times in a loop, it’s more efficient to store it in a variable.
Similarly, accessing the array’s length property inside a loop may lead to redundant calculations on each iteration. By caching the data and array length, you can make your loops cleaner and faster.
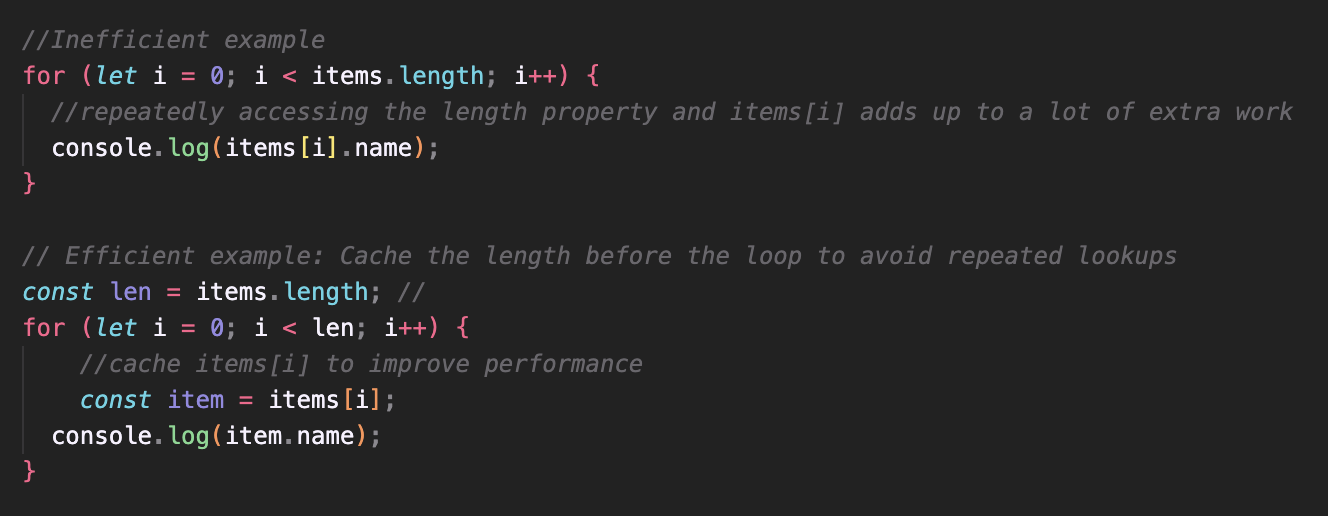
In the image above, both items[i] and items.length are accessed repeatedly in the inefficient example. Caching these values into variables (here we used “item” and “len”) reduces repetitive lookups and speeds up the loop. This is especially helpful when working with large datasets.
Storing data in an object instead of an array can also be a great way to optimize your JavaScript performance. Iterating through an array (especially a large one) can take up a lot of extra time.

For example, instead of iterating through the users object and checking if the current user’s id matches 2 (left), you can directly access the user with the id of 2 (right).
Our example on the left is using linear O(n) time complexity as the time it will take to complete depends on the length of the array. On the right, we observe constant O(1) time complexity as we are not iterating but, instead are accessing the property directly.
Direct property access is more efficient than using linear time complexity with an array.
Flattening deeply nested objects also reduces the effort JavaScript has to put into accessing properties inside nested structures.
Deeply nested objects can be a lot like those Russian dolls where you have to open up each one, layer by layer to reach the doll at the core. Similarly, accessing properties within nested objects can require a lot of effort from your Javascript. To take some of that load off, we can flatten our structure.

The example above declares a recursive function to flatten our deeply nested object so that all of the properties are accessible as top-level keys. If this code looks a bit intimidating, don’t worry! All you need to know for now is that, once our object is flattened, we can access the properties directly as seen below.

Whenever you can, go for direct property access instead of using dynamic keys. Dynamic keys (like object[key]) can be useful when you need to figure out the key at runtime, but the browser has to calculate the key before grabbing the value.
Directly accessing a property (ie: object.property) can be a better option for optimizing speed.
Dynamic keys are still super useful when iterating over an object’s keys or dealing with property names that aren’t set in stone. In those cases, having the flexibility of dynamic access is more important than direct access.

Directly accessing a property–as shown above– can also simplify the debugging process, as the property names are stated explicitly rather than hidden in variables.
If you’re looking for another way to optimize your Javascript in frequent look-up situations or unique collections:
By caching lookups, minimizing your redundant operations, simplifying structures, and choosing the right tools like Maps and Sets, you can handle even large datasets with ease.
HTTP caching stores frequently accessed data locally, reducing server requests and improving load times. When you load resources such as images, the browser caches them, so it doesn’t have to request them again during subsequent visits.

Set caching headers during server development to instruct the client on how to handle caching, using headers like cache-control, expires, ETag, and last modified. The cache-control header is most commonly used today to define caching policies and resource expiration times.
Today, “cache-control” is used more frequently than other headers. Here’s what you need to know:

In this example, we:
The use of http caching is a bit nuanced and may seem like an intimidating and complicated practice but, once you get the hang of it, it can be a fantastic way to speed up your application and optimize your JavaScript code.
By caching resources effectively, you can improve the speed of your website and reduce the load on the server.
Throttling ensures that an operation triggered by an event (e.g., scrolling) will only occur once during a specified time period, even if the event is triggered multiple times. This can prevent events from being fired too frequently, which would otherwise lead to performance issues.

In the example above, we define a variable, “lastExecution" to track the last time a function was invoked. In the “throttledFunction”, we compare the current time (labelled “now”) with the last invocation time. If 500 milliseconds have passed, the function logs "Function executed!" to the console and updates “lastExecution” to the current time. Finally, we add an event listener to the window object (the browser). This tells the browser “if you detect any scrolling, execute ‘throttledFunction’. ”
Without throttling, events triggered by scrolling, resizing, clicking, etc. could be called hundreds or even thousands of times in a very short period which can lead to slow rendering or high volumes of requests.
Debouncing, on the other hand, ensures that a function is only executed after a certain amount of time has passed since the last event trigger. For example, in a search bar, debounce is used so that an API request is only made once the user stops typing for a moment.

Debouncing can be used in the following way:
Both techniques reduce unnecessary function calls, which can help optimize JavaScript performance.
We take a more in depth look into these two techniques in our article Your Guide to Debouncing in JavaScript so, as you’re expanding your understanding of them, be sure to check it out. Once you get a bit more comfortable with them, they can be used to optimize your app by controlling how many events are triggered and how often.
JavaScript is single-threaded, meaning it executes one line of code at a time. When long-running synchronous code executes, it blocks the main thread, making the entire UI unresponsive. Asynchronous code, however, allows your code to run without blocking the main thread, keeping your UI responsive.
In the example below, the thread of execution will not move on to the console.log until the “for loop” completes.

In order to optimize your JavaScript code, it’s always a good idea to use asynchronous code for tasks like:
Common asynchronous methods include setTimeout, setInterval, and Promises. For example, using async/await syntax makes asynchronous code more readable and easier to manage, improving performance by offloading time-consuming tasks to the background. Let’s take a look at some common ways to handle asynchronous operations in your code.

setInterval will continue running a function at a given interval. Like setTimeout, it takes two parameters: the function to be run and the amount of time to let pass between invocations. Take a peek at Codesmith’s Asynchronous JavaScript unit in CSX if you want to learn more about these methods.

The “fetchData” function is designed to do the following:

Asynchronous code can feel a bit tricky. But when it comes to JavaScript performance optimization, this technique is essential in offloading long running tasks from the main thread keeping your app responsive and performant. For more information on the inner workings of asynchronous code, check out Codesmith’s “Hard Parts” lecture on Async and Promises.
Network requests are essential for web applications, but they can slow down performance if too many resources are loaded at once. Whenever you visit a website, the browser sends a network request to a server to ask for the files needed to display the webpage (scripts, images, stylesheets, etc.). The requests travel over the internet, and the server responds by sending the requested resources (or an error!) back to the browser.
For applications that only render small pages with limited data, the process can happen quickly. But for data heavy applications that need to load up lots of images or third-party scripts (ads, embedded video content, etc.) these requests can accumulate, slowing down load times.
Lazy loading helps optimize network requests by deferring the loading of resources until they are actually needed.
For example, images are commonly lazy-loaded, meaning they are only loaded when they scroll into view. By implementing lazy loading, you reduce the number of resources requested upfront, leading to faster page load times and better overall performance.

In this example HTML, each image is set with a lightweight placeholder image, and a “data-src” attribute to hold the real image source.

If Javascript performance optimization is your priority, Lazy loading can be tremendously helpful. When you only load the resources you need, you improve your initial load times because fewer resources are required upfront. This improves overall user experience because your application will be more responsive and speedy, especially on slower networks.
By default, when a browser encounters a <script> tag in HTML, it stops parsing the HTML to download and execute the script. This can lead to delays in rendering, especially if the script is non-critical.
To improve load times, you can use the defer or async attributes on <script> tags. The defer attribute ensures the script is executed only after the HTML is fully parsed, while async executes the script as soon as it is ready, without waiting for the rest of the HTML.
Let's see how we can structure these tags:

Here is what’s happening above:
Given the above setup, the scripts will load and execute in the following order:
Allowing non-essential scripts to load quietly in the background and prioritizing only the most important functionality ensures that critical features like navigation, buttons, and key interactions are available as quickly as possible. This reduces the risk of bottlenecks, improves page load times, and creates a smoother, more responsive application. Prioritizing script execution is a simple and powerful way to achieve more effective JavaScript performance optimization.
By controlling script loading, you ensure that critical functionality is prioritized, which reduces bottlenecks and speeds up page loading.
As your JavaScript application grows, the number of files and the size of your codebase increase, which can slow down page load times. Minifying JavaScript removes unnecessary spaces, characters, and comments, reducing the file size.
Minifying refers to the concept of eliminating any unnecessary spaces, characters, breaks, etc. without changing the code’s functionality. Below is a basic example of two versions of a function “sum”- the original version, followed by a minified version.

Often, a file will have hundreds or even thousands of lines of code. In those cases, minification can significantly reduce file sizes, improve load times, and ultimately provide users with the smoothest experience possible.
Bundling your code is the process of combining your JavaScript files into one or a few files. When your code is broken up into several files, the browser has to make multiple HTTP requests to fetch each one of them. As we know, HTTP requests are asynchronous meaning they take time. Having too many of them can significantly slow down your application.
Remember how we talked about HTTP caching for JavaScript performance optimization? Well, you can improve your code even further by caching a bundled file. Let’s say we have three files (index.js, app.js and api.js). We can bundle these files into one (bundle.js) and then have the browser cache that bundle. That way, after the initial load, users won’t need to download those files again- as long as the bundle remains unchanged.
With several files bundled into one and then minified, you can significantly reduce the size of your application resulting in faster load times and happy users. Fortunately there are tools for doing such.
Webpack is among the most popular tools for bundling and minifying your code. It allows you to bundle your files and dependencies and has built in plugins to minify that bundle. We won’t dive into the nuances of Webpack as its configuration can be pretty complicated. But to get an idea of how it works, take a look at the example below. We would create a webpack configuration file (webpack.config.js) and, within that file, make the necessary imports define/export our configuration object.

Minifying and bundling are of paramount importance for JavaScript performance optimization as they shorten and trim up your code to decrease load times and keep users engaged in your application.
Adding libraries and dependencies can increase the size of your application, slowing down load times. Before importing a new dependency, evaluate whether it’s necessary. Instead of importing entire libraries, consider using modular imports to only bring in the parts you need.
Often, the browser has all the functionality you need. For example, instead of importing the “axios” library for HTTP requests, we can simply use the native “fetch” API which is built into most modern browsers.

For example, rather than importing the entire lodash library, you can import only the specific function you need, which reduces the size of your bundle.
Below is an example of importing the entire “lodash” library (a JS library for working with objects, arrays, numbers, strings, etc.) vs. only importing the method we want to use. Understanding what’s happening in the function isn’t as important as knowing that the code works exactly the same in both examples but the second one is more efficient.

And just to really drive this point home, neither of these imports are actually necessary as we could simply use the native JavaScript “Array.prototype.findIndex” method instead.

JavaScript performance optimization is crucial for maintaining a smooth, fast, and user-friendly experience on your website.
By implementing these top 10 techniques—such as reducing DOM manipulation, optimizing loops, leveraging caching, and using asynchronous programming—you can significantly enhance your web application’s performance.
Happy coding!

Explore CS Prep further in our beginner-friendly program.
Get more free resources and access to coding events every 2 weeks.

Connect with one of our graduates/recruiters.

Our graduates/recruiters work at:

Sam and Alex are writing partners, content creators, proud Codesmith alumni, and best friends. Former professional dancers/actors, the two transitioned into software development from musical theatre to bring their creative energy and passion for storytelling into the world of tech — specifically in developer relations. Their mission is simple: make software development fun, accessible, and community-driven. Through comedy, empathy, and a deep understanding of what makes content resonate, Alex and Sam strive to build bridges between developers and the tools they love. Sam, a Lead Engineering Fellow at Codesmith, is known among students and colleagues for his empathetic teaching style, strong sense of responsibility toward his students, and infectious sense of humor. Alex, a Technical Content Creator at Codesmith, blends technical knowledge with storytelling and humor to turn complex topics into engaging, easy-to-understand content.

Connect with one of our recruiters to learn about their journeys.
Our graduates/recruiters work at:

Copyright @ 2025 Codesmith | All Rights Reserved
Terms and ConditionsPrivacy PolicyRegulatory Information

%20(4).png)